How to create or modify templates in Word
Make System One work for you by creating custom Word templates for your agency.
Word templates save you time by using System One data to instantly generate custom documents such as itineraries, contracts, invoices and more. Creating and styling templates takes a little time, but you only need to do it once!
Before we begin, make sure you have access to the latest version of Microsoft Word.
This guide comprises of five parts
- Accessing templates on System One
- Building or modifying Word templates
- Uploading Word templates to System One
- Testing and troubleshooting Word templates
- Sample document templates
1. Accessing templates
This section explains how to access the most common types of templates used on System One - itineraries, contracts and invoices.
To access templates on System One:
1. Log in to System One.
2. Access templates by navigating to Template Settings via the top right menu.

3. Then it depends on which type of template is required:
a. For itinerary templates, navigate to Word templates for detail view > Shows
b. For contract templates, navigate to Word templates for detail view > Contracts
c. For invoice templates, navigate to Word templates for detail view > Invoices

If you have previously uploaded templates, you will find them in the respective section.
2. Building or modifying Word templates
Before building or modifying your templates, it’s helpful to understand what merge fields are.
Merge fields are used to link information from System One with your template. Each date field in System One has a unique merge field code. For example the merge field code for the Artist name is «AppRel1Name». By adding this merge field code into your Word template, the document generator pulls the Artist name from System One, and places it in your document.
System One merge field codes
You can view all System One merge field codes here.
Let’s begin creating your template:
1. When you are modifying an existing template, first locate the template on System One, then download the document and open it with Microsoft Word.
When you’re creating a new template, open a new Microsoft Word file to start from scratch or use one of the sample templates that you can download at the end of this guide.
EXPERT USER TIP
If you want to create a new template and keep your existing styling (fonts, layout, logos, etc), we recommend that you copy an existing template on System One, rename it, download it and use that document as a basis to work from.

2. Find your required System One merge field code by accessing the System One Merge Field Code lists here. Note, make sure that you are logged onto your System One account to see all the available merge fields.
EXPERT USER TIP
To quickly find merge field codes, use your browser’s find bar. (Shortcut: Control+F on Windows or Command+F on Mac)
3. Next, to add a new merge field to your document template, first click in the document where you want to add the merge field, then:
When using Windows:
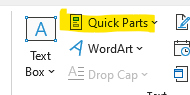
I. Navigate to the Insert tab
II. Open Quick Parts and select Field
III. Choose:
a. Categories: (All)
b. Field names: MergeField
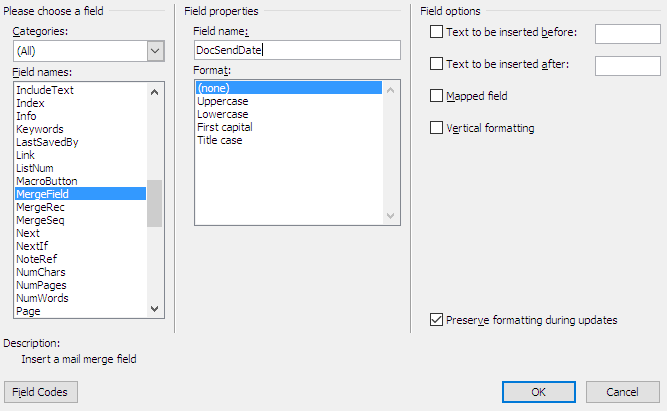
IV. Then in Field Name, type or paste your required System One merge field code
V. Click OK to add your merge field to your document
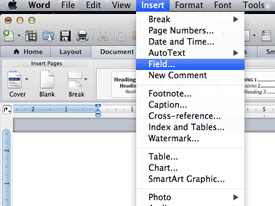
When using Mac:
I. Select Insert > Field
II. Choose:
a. Categories: (All)
b. Field names: MergeField
III. In Field Codes, type or paste your required unique merge field code after MergeField
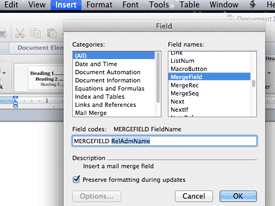
IV. Click OK to add your merge field to your document
4. To modify existing merge fields on your document, find your required System One merge field code from the lists here.
When using Windows:
I. Right click on the target merge field, click Edit Field…
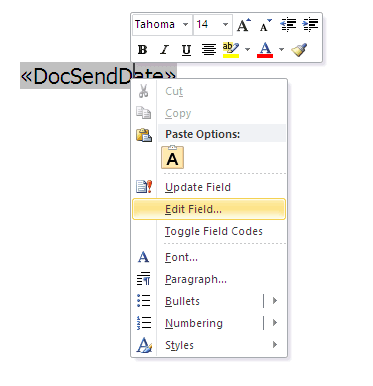
II. Change the System One merge field code in Field Name
III. Click OK
If using Mac:
I. Right click on the target merge field, then click Toggle Field Codes
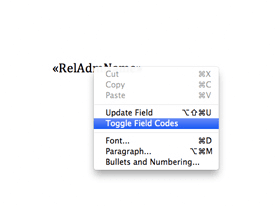
II. The merge field will expand in the document
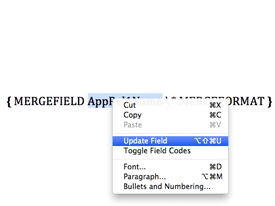
III. Change the System One merge field code (the part after MERGEFIELD and before the \)

IV. Right click on the merge field again and click Update Field
5. Repeat this process until you’ve added/modified all of your merge fields.
6. Now use Word’s standard styling tools to style your templates according to your agencies styling guidelines.
7. Finally, save the template.
3. Uploading templates to System One
Once you’ve finished with your template, it’s time to upload it to System One.
1. Log in to your System One Account
2. Access templates by navigating to Template Settings
3 . Under Template Settings select the section which matches template you’ve built:
a. Itinerary templates should be uploaded in Word templates for detail view > Shows
b. Contract templates should be uploaded in Word templates for detail view > Contracts
c. Invoice templates should be uploaded in Word templates for detail view > Invoices
4. Then:
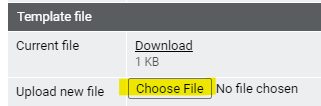
a. If adding a new template, click New, fill in the details, upload the template, then hit Save.
b. If modifying an existing template, click on the existing template from the list then upload your modified template by clicking Choose file.
5. Now your new template is ready to be used.
4. Testing and troubleshooting Word templates
We recommend that you test your new template to make sure it’s working correctly.
1. Navigate to the section in System One that corresponds with the type of template you have uploaded.
For example, if you created an itinerary, navigate to the show detail view.
2. If you have uploaded the template correctly, you should see your template in the corresponding part of System One.
For example we can find the itinerary template in the Generate document from template panel on an show detail view.
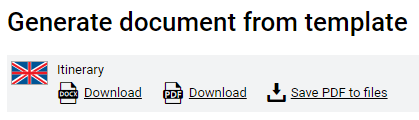
3. Click Download to download the document.
4. Open the document and check that the document data corresponds to the data you wanted to link using Merge fields.
a. If it does, great!
b. If it doesn’t, troubleshoot the error using the common reasons below.
Common reasons why templates are not working properly:
1. The merge field code is copy-pasted, not inserted:
For merge fields to work they must be inserted into the template using Microsoft Word’s Field tool.
Just copying the merge field code from the list and pasting it into the document will not link the System One data to your document.
To learn how to insert merge fields, see the section of this guide called Building or modifying Word templates
2. Template uploaded in wrong location:
Make sure you uploaded your document template in settings correctly:
- Itinerary templates should be uploaded in Word templates for detail view > Shows.
- Contract templates should be uploaded in Word templates for detail view > Contracts.
- Invoice templates should be uploaded in Word templates for detail view > Invoices.
Still can’t make it work?
Contact our friendly support team for guidance.
5. Sample document templates
We provide a number of sample document templates which you can use as a basis. These templates must be carefully examined and modified to suit your agency's requirements. We recommend that you seek professional advice to ensure your templates meet all legal requirements applicable to you.